

I’ve wanted a birch tree wall mural for so long… in case you haven’t noticed from my etsy shop, my living room décor, or my pinterest account, I’m a little obsessed with trees, branches, and woodgrain anything. So when I decided to redo my office and I knew it would be my area and I could do whatever I wanted, I determined I had to have a wall-o-trees. I did a lot of research and looked at vinyl tree decals, but I decided since I can make my own tree art with a computer then I should be able to make my own tree wall mural with paint. Here are the two pictures I used as my inspiration (the one on the left is my own art, the one on the right is a vinyl decal.)
 | ||||
| Left: Aqua Blue Forest with Red Birds by Priss Designs on etsy; Right: Wild Birch Forest with Owl Wall Decal by designedDesigner on etsy. |
The only supplies you need to paint your own birch tree wall are painter’s tape (I love the 2” wide green Frogtape, I think it works so much better than the blue tape), an X-acto knife, and paint.
 |
| Frogtape; Martha Stewart Paint; X-Acto Knife |
To begin, tape two straight-ish lines for each tree, flaring them out slightly at the bottom. Don’t push your tape too tightly onto the wall at this point. I just randomly made little groupings of trees, although looking back I wish I had done 1-2 more trees instead of having the two bigger spaces, but I couldn’t go back in and add them without it looking weird and cluttered.

Next, using your X-acto knife, cut slivers of your tape out so your tree isn’t just straight up and down. Think about a real tree and how it has knots sticking out- To begin with, I was just cutting little slivers out of short sections, but by the end I was literally running my X-acto from the very top of the tape to the bottom, weaving slightly in and out as I went down, and it ended up being much easier to remove the tape that way. If you have a brand new super sharp X-acto, you really don’t need to push hard at all on the tape, just lightly score the surface and when you pull off the cut part, it will naturally want to break at your score line.
I did need to go back and re-cut parts that tried to tear at the wrong points, and I did make a couple too- deep cuts in my wall (but you can’t tell now that everything is painted), but I really think if you don’t push the tape down too hard to begin with then the tape-wall bond won’t be as strong and the tearing off part will be easier.

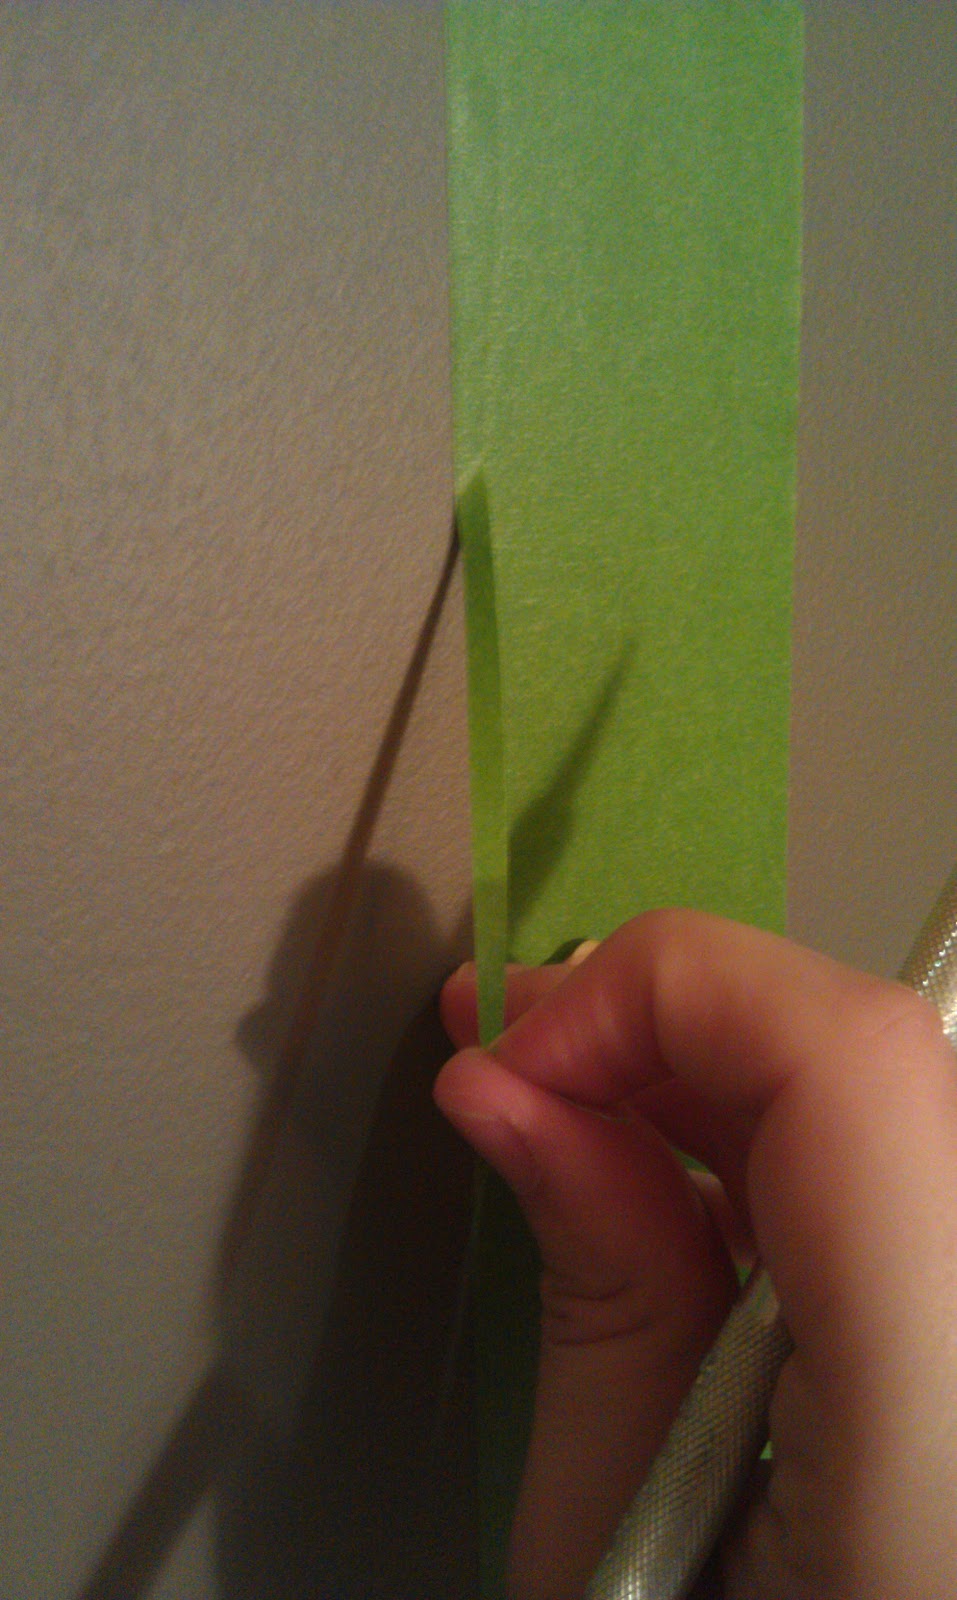
No lie, the taping/cutting part probably only took me about 30 minutes. Just eyeball your trees and then go to town with your X-acto knife.
Next, I decided I wanted a few branches to fill in the spaces between the trees, and I used my tree artwork as inspiration for my branches. Looking at my wall now (and considering the extra work it cost me- I’ll get to that later), I’m not sure I’m in love with the branches. Although someone who has seen it now that it is finished said the branches make it look more like trees (you know, for people who haven’t been lusting over tree walls for years like me, they might not immediately realize that lines on a wall are supposed to be trees). I used my tape to “draw” some rough branch shapes then used my X-acto to cut out the actual shape I wanted. You also have to cut through the part of your original tree’s tape to connect the shapes.
 |
| Making the branch shapes |
 |
| After cutting branches out |
When you are finished with all your cutting, then go around the edge of the tape that you will be painting on and really push down on the tape, trying to adhere it as well as possible to the wall. I use a couple fingers or the heel of my palm and rub back and forth. I’ve also heard of using the bottom of a spoon to go around everything. And just on a side note, if you are doing a smaller project and really want crisp paint lines, you can use clear nail polish along the edge of the tape and let it dry, and it seals the tape line so no paint can get under the seal. I did it when I painted one tree on my niece’s wall, but a lot of trees on a big wall would need a whole lot of nail polish!
Anyway, so now you’re ready to paint! I got my white paint from the Oops bin at Home Depot, $7 for a gallon of Martha Stewart paint, so I think it’s a pretty good deal… not sure why it was in the oops bin, it said “bright white” and the paint looked pretty bright white to me, but maybe they tinted it a little or something.
I painted my first coat with a small paint roller and it looked like this:

Not so great, I know. My husband came downstairs and said “whoa, how many coats are you gonna have to do to cover the gray?”… probably should’ve primed it, but oh well. Well, the answer is three. Three coats of paint. After using the roller for the first coat, I used a paint brush for the second two coats and it really didn’t leave paint strokes and it covered a million times better.

After my third coat of paint, I got to the “birch bark” part of my trees. While my tape was still in place, I just started painting lines with a smaller paint brush… some were more like long U’s, some were just straight, some were more like little sideways U’s, and I made a couple ovals that looked like knots. I just kinda free-handed it on the first tree, then took off the tape after a couple minutes to make sure I liked how it was looking before I did the rest of my trees. A couple tips from a design standpoint: I think it looks a little better if you have more “bark” on one side of all your trees (as in, left instead of right) just because there would be more shadows on one side of your tree in a forest. Also, keep in mind that you can always add more, but you can’t take away (well, I guess you could paint over some lines with your white paint again if you wanted less lines, but that would be extra work.
So, I did my bark on all my trees, and then removed the tape! This is the exciting part, when you really start to see your vision coming together.

I loved my trees… the branches, not so much. They looked all huge and wonky and I was really considering completely painting over them, but then I decided I just needed to make them skinnier. So I freehand painted around them with a smaller paintbrush. I also went back and filled in some of my “bark” with an even smaller round brush to eliminate some of my paint strokes on the ends of my lines where the paintbrush hairs left little trails.
And voila! DIY painted mural birch tree wall.
Next up on my office makeover is DIY painted IKEA storage boxes with a yellow chevron pattern. Here's a sneak peak:

I was featured on:


I'm linking up to some crafty parties this week!
http://inmyownstyle.com
http://www.katiesnestingspot.com
http://www.everydaytastes.com
http://bec4-beyondthepicketfence.blogspot.com/
http://simplydesigning.blogspot.com/
http://frenchcountrycottage.blogspot.com/
http://www.skiptomylou.org/
http://makingtheworldcuter.com/
http://madincrafts.blogspot.com/


Wow! This is amazing! Great job!!! :)
ReplyDelete-Bonnie @ Revolutionaries
http://bonniegetchell.blogspot.com
I've been wanting to do this a long time....thanks for posting. I, too, confess a lust for tree artwork; however, my mural won't be complete without at least one or two small friendly little birds on a branch to add a bit of cheer and whimsy, but also I'm a bit lustful over bird art as well. :)
ReplyDeleteCan't wait to start it.
Oh this looks very similar to what we did in my little guy's nursery, expect I used vinyl. I love your version and I would love for you to link this up at "Do Something Crafty Friday": http://vanessascraftynest.blogspot.com/2011/09/do-something-crafty-friday_09.html
ReplyDeleteTotally loving how this turned out! It's wonderful and you did a fantastic job on it!! Well done!! Thanks for linking up at Feathered Nest Friday! :)
ReplyDeleteWow--what a great job I am so impressed!
ReplyDeleteI love this! Such a great idea. I'd love if you'd share it at my blog hop this weekend.Hope you can join in!
ReplyDeleteI absolutely love this!! I've been wanting to do something similar but didn't want to pay a bunch for stencils or wallpaper!! Thanks for the great tutorial! I featured you on my blog today!!
ReplyDeletehttp://craptastickatie.blogspot.com/2011/09/five-feature-friday-8.html
This looks great.. I'm wanting to do a birch tree mural on my bedroom wall, but was going to use an overhead projector and transparencies. I'm thinking this is much easier. I prefer to just freehand it anyway. :)
ReplyDeleteI'm a new follower - would love it if you'd check out my blog sometime
M
LOVE these birch trees! so so clever.
ReplyDelete(i have real one's all around our garden!)
great tutorial.
cheryl xox.
You did a great job! I just posted on Aspen trees {look the same as Birch I'd say} today because I want to paint them in my twin boys' nursery. Thanks so much for the tutorial!!
ReplyDeleteCleverly and beautifully done! I will put this on my list of things to try in my guest bathroom. Thanks for a great tutorial.
ReplyDeleteLove this! It looks amazing! : )
ReplyDeleteWow! That turned out great. Thanks for sharing.
ReplyDeletecookienut.blogspot.com
Wow! That is fantastic! I have wanted to do this for a long time...
ReplyDeleteJessica
Chapman Place
So cute! It would be fun to have a space that's my own where I could incorporate design that The Mr. doesn't approve of (like pink and girly things). The design is awesome, of course, and I like the color scheme you chose as well. I featured you on my blog this week:
ReplyDeletehttp://www.imbusyprocrastinating.com/2011/09/get-me-motivated-monday_12.html
oh my gosh!! thats totally fantastic.. You've given me a brilliant idea.. I've painted one bedroom wall.. a lovely green.. and didnt know what else to do.. So this sure looks like a fab idea..
ReplyDeleteHey.. you've done this sooooooooooooo well!! Super duper impressive.. Do come by and say hello to me at Colours Dekor.. and when you can.. do join my Monday linky party too.. :-) http://coloursdekor.blogspot.com/2011/09/weekly-story-wk-48.html
Wow- great job! This is so inspiring that you made the birch effect yourself! Amazing job!! :)
ReplyDeleteLove what you have done, it is stunning:)
ReplyDeleteThanks for the compliments everyone!
ReplyDeleteI love this wall! It is absolutely stunning!
ReplyDeleteI would love if you would share with my Blog Stalking Thursday Linky Party. http://thecraftyblogstalker.blogspot.com/
See You There!
Looks beautiful!
ReplyDeleteIt looks amazing! It looks like you have lots of invites, but I would love it if you shared it at my linky party Tuesday night. Pinned it!
ReplyDeleteJenn :)
www.cleanandscentsible.blogspot.com
I love these wall murals! It looks fantastic!Blogger,Could you supply some more information about these murals for me?
ReplyDeleteAck! I keep looking at birch tree art wherever I go and I LOVE this! I'm thinking maybe with a robins egg blue background it might work for a nursery? That's the only place I can think of to use this idea in my home. Thinking that especially with the grey it could of looked ok even with the grey peeking through a bit (like when you painted the first or second coat). Kind of like natural birch bark. Just an idea for the lazy I guess...haha Thank you so much for sharing this!
ReplyDeleteI totally followed your tutorial and I loved the results! Thanks so much for the idea!
ReplyDeleteThanks for the tutorial! i love it so much and i did it right away to my bedroom,
ReplyDeletehere's the outcome if you have time to see it http://imajinasimaginatia.blogspot.com/2011/10/bringing-forest-inside.html
thanks again, it was so fun project also :D
Wow! You did a great job! Better than mine! Thanks to everyone who has commented!
ReplyDeleteI love this! I am doing something similar in my nursery, so this tutorial was really helpful!!
ReplyDeleteI am so grateful I stumbled upon this tutorial. I recently decided to do an accent wall to help disguise a wall-mounted tv and wires, and out of desperation I almost ordered a birch tree stencil for $75 including shipping. This will be so much easier and completely original. Way to be thrifty!
ReplyDeleteGreat post, you gave me some ideas on how to tackle my next mural project. I painted a few birch trees for my son's room as well. If you'd like to see it I wrote a blog on it, would love to read your thoughts if you have the time:
ReplyDeletehttp://simplynamoured.blogspot.com/2012/03/room-tour-noahs-room.html
Painted by murals said really its very nice and great job
ReplyDeleteYou'll find clues about the underlying tones of different shades of a color on a full sample strip of coordinated colors. Even if you're not even considering using a darker tone, look at all the colors carefully. Decide if the family of colors is the direction you're headed with your color selection.
ReplyDeleteThe diy painted birch wall forest shown here is superb. Have a look at it
ReplyDeleteYou did this yourself? You do have talent in creating wall mural. I like your work here. The trees came out really nicely. The combination of gray and white is amazing. I would love it more if you’ll add falling leaves. What do you think? #Clinton Hurlburt
ReplyDeleteI get some inspiration phoenixpaintinganddrywall.com. I really like the birch color effect here.
ReplyDeleteThis comment has been removed by the author.
ReplyDeleteHi, I get some inspiration from your blog. Look my wall now http://eldioni.blogspot.com/2013/11/de-como-converti-mi-pared-en-un-bosque.html. Thanks
ReplyDeleteBold and neat design. Very effective, especially with the dark background. Dutch painter Piet Mondrian painted a tree in a similar way, Most popular Artists , that I saw at wahooart.com who can make a good canvas print of the image.
ReplyDeleteI love that it's fresh and different but still a classic pattern/color
ReplyDeleteThe mural is very elegant and lovely. Beautiful work.
ReplyDeleteSorry to say sir but mostly images are not working. Please check their links or reupload these files again. Thank you so much ,. (y)
ReplyDeleteDigital Marketing Institute in Delhi
Digital Marketing Course in Delhi
Digital Marketing Course in Laxmi Nagar
Digital Marketing Institute in Laxmi Nagar
Digital Marketing Institute in Nirman Vihar
Digital Marketing Course in Nirman Vihar
Digital Marketing Institute in Preet Vihar
Digital Marketing Course in Preet Vihar
Thanks for the compliments everyone! Thanks for sharing this with us.
ReplyDeleteMobile Repairing Institute in Delhi
Mobile Repairing Course in Delhi
Excellent information on your blog, Really looking forward to read more. Good night
ReplyDeleteMobile Repairing Institute in Delhi
Mobile Repairing Course in Delhi
Mobile Repairing Course in Laxmi Nagar
Mobile Repairing Institute in Laxmi Nagar
Thanks for give me information on this topic. you have sharing very nice post.
ReplyDeletehttp://delraybeachpainting.com/
The need to identify such materials will also undoubtedly become a requirement for those responsible for, and those involved with refurbishment, demolition and general construction works. https://www.envirohive.co.uk/
ReplyDeleteFirst and foremost, thank you for providing this fantastic information; I believe it will be of assistance to me. I'm hoping you'll update this article with more useful blogging knowledge. Also, I'll be waiting for your next post.
ReplyDeletedigital marketing training in hyderabad
digital marketing course in ameerpet
digital marketing course training in hyderabad ameerpet
digital marketing online training in hyderabad
digital marketing course in hyderabad
digital marketing course training in hyderabad
digital marketing course with internship in hyderabad
digital marketing training institute in hyderabad
digital marketing course in hyderabad ameerpet
Thankyou For Posting This Useful Information,
ReplyDeleteMOBILE REPAIRING COURSE Is The Future Of All Technical Industries Becouse This Is The Best Short Term Course To Achive Your All Goals In Your Life Hance I Strongly Recommend You All To Join The Best Mobile Repairing course in Delhi,India
MOBILE REPAIRING INSTITUTE
Thanks for a very interesting blog. What else may I get that kind of info written in such a perfect approach? I’ve a undertaking that I am simply now operating on, and I have been at the look out for such info.
ReplyDeleteLaptop Repairing Course In Delhi
kyrie 8
ReplyDeletejordan 4
100% real jordans for cheap
kyrie shoes
golden goose
off-white
yeezy
off white
fear of god hoodie
bape
hermes outlet
ReplyDeletejordan shoes
jordan shoes
golden goose outlet
hermes outlet
cheap jordan
supreme outlet
Jordan Travis Scott
off white t shirt
giannis shoes
ReplyDeleteTo create and send purchase orders in QuickBooks Online, follow these steps:
Log in to your QuickBooks Online account.
Go to the "Create" menu and select "Purchase Order."
Enter the necessary details, such as vendor information, items, quantities, and prices.
Save the purchase order and click "Send" to email it to the vendor.
Review and confirm the email details, then click "Send" to complete the process.
Put more information on your website like this one, I really like these types of blogs
ReplyDeletehttps://esmartprints.com/product-category/roll-up-banners/
Very informative blog, thanks for sharing this useful information. Atrial Septal Defect (ASD) or Ventricular Septal Defect (VSD) is generally termed as hole in the heart, a type of congenital heart defect.
ReplyDeleteThanks for sharing this wonderful blog, keep posting. Here root canal treatment (also known as endodontic therapy, endodontic treatment or root canal therapy) is a dental procedure used to repair and save a damaged or infected tooth without removing it permanently.
ReplyDeleteVery informative blog, thanks for sharing this post. Here Chronic Otitis Media (COM) is commonly referred to as infection of the middle ear. Talking about the middle ear, it is a shallow chamber behind the ear drum which houses the small bones to transmit sound from the eardrum to the inner ear.
ReplyDeleteThis is a very nice blog. Keep posting. Maverick India – Your trusted partner for creative advertising in India. We combine strategy, design, and digital expertise to create impactful campaigns. For more information call us at 9540886600.
ReplyDeleteVery nice blog; thank you for sharing this post. Kangaro KGOC is truly an iconic stationery brand in India, trusted for its superior-quality staplers, paper punches, staple removers, and staples. Their durable products make office and school tasks easier, reliable, and efficient, setting high standards in stationery solutions. Call 01612674904 for details.
ReplyDelete